Let's assume that we have a project requiring the following configuration.
- A4 sized paper documents which need to be scanned with 200 dpi, in color and double-sided.
- The documents are old and therefore slightly soiled, which might lead to errors in the images produced.
- The paper documents are files with personnel records, which are supposed to be stored digitally, each paper folder as a separate file. The scanned documents are supposed to be saved to a folder structure comprised of the client's name, followed by today's date.
- In order to easily find content, at some later time, the resulting PDF/A files need to be fully text searchable
Now let's see how this scenario may be handled with CROSSCAP. Quick mode will be of little help here, since bar code recognition and subdirectories are required. So, we will be using project mode instead and therefore, to begin with, we will need to define a suitable project template:
-
Please start your version of CROSSCAP.
-
Change the project settings mode to expert mode: Click on the lower half of icon Project settings (in the Settings toolbar) and tick Expert mode.
-
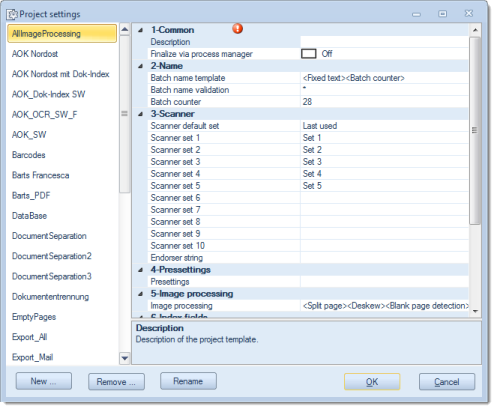
Now click on the top half of icon Project settings, which will open a window with all existing project templates (shown on the left) and a summary list of all available project settings (the two column table on the right hand side).
-
Create a new project template using the New … button (bottom left) and give it a name of your choice. In our example, let's use the name Customer ABC.
You will find your newly created template listed in the window on the left side, together with all other project templates. The right side of the dialog will display all settings for the project template highlighted on the left.
Now, let's take a closer look at the configuration items listed in sections 1 through 9. Only the items needing to be changed will be discussed here:
01-Common
Description
Enter a meaningful template description here. A detailed description might be very helpful in cases where scan operators frequently change places and you need to provide them with background information and instructions for the scan job on hand.
Longer entries can be made by clicking on thebutton, which will open a separate text entry box. For the purposes of this test project, it will suffice to enter just any short text.
02-Name
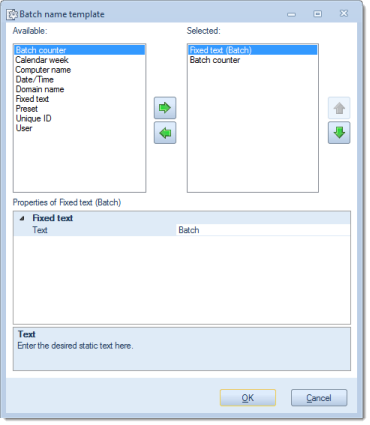
Batch name template
Batch names can be dynamically generated by combining several components. The default batch name template, for example, is comprised of a text section and a batch counter.
You may access and modify the template components clicking by on the
For the purposes of our sample project, we will just modify the text section. Click/select the Fixed text entry, in the right window (Selected) and enter Personnel records, in the text option appearing in the bottom section (Properties).
03-Scanner
Scanner set 1
The use of these settings depends on the capabilities of your scanner / scanner driver.
If possible, all scanner settings can be made here, instead during batch runs, e.g.:
04-Presets
Presets
We won't be using any presets in this sample project, therefore you may ignore this section, for now.
05-Image processing
Bar code
Since document separation is required, special separator pages (with a patch code printed on them, a special type of barcode) have been inserted ahead of each personnel record in the document pile. CROSSCAP needs to be instructed to detect these patch codes and to place a logical marker for Document separation in the resulting data stream, accordingly. Separator pages are not supposed to appear in the output files.
The following settings need to be applied:
Choose Bar code from the available options and make the following detail adjustments:
Despeckle
For the purpose of removing traces of dirt and dust from scanned images, add Despeckle, as the second image processing option (Please note that the Despeckle function is CPU-intensive and may noticeably slow down project execution).
Since removing traces of dirt and dust from the image might also improve bar code detection, you should move the despeckle function to the top of the list of selected image processing functions (image processing functions are processed in sequence, beginning at the top of the list).
06-Index fields
No indexing information will be created in this sample project, therefore you may ignore this section, for now.
07-Directories
Project directory
Enter a path to a local directory or to a network drive. In this example, let's assume that you have decided to use the local drive C: and have already created a folder Scan service with the subfolder Customer. You may either enter the path: C:\Scan service\Customer manually, or simply call the extended menu (
Batch directory template
In our sample project, the scanned documents are supposed to be saved to a folder structure comprised of the client's name, followed by today's date.
First, open the extended menu (
Next, add the following items to the right window (Selected) and arrange them in this order (top to bottom): Fixed text, Directory separator, Date / Time.
Enter Customer ABC, as Fixed text. The Directory separator item will later simply insert a "\" character (backslash), into the resulting directory path. Finally, for the puposes of this sample project, we will just accept the default settings for the Date / Time item.
08-Export
Export (top line)
The project requires the output of a searchable PDF/A files.
Make PDF/A Document the only selected export option.
In the Output section of the properties window, identify the line for File name and make the following extended settings:
In the Filter section of the properties window, On must be selected for the Ignore blank pages option.
In the OCR section of the properties window (this is the text recognition section), activate Full text generate and Deskew (Deskew will improve text recognition results).
09-Counter
Software Counter
Software counters will note be used in this sample project, therefore you may ignore this section, for now.
This concludes the configuration of our project template. To actually start the project, return to the Control menu and click Start batch. Select the project template you just created and launch the batch with OK. The currently active batch and the name of the project template should be displayed in the title bar.
If necessary, select a scanner, then click on Batch scan to begin with scanning.
Once all documents have been scanned, click on Finalize. CROSSCAP will now further process the scanned batch and output all data into the specified folder.