Digital print will automatically and persistently place additional, custom text on scanned images (as opposed to the Stamp tool, which needs to be operated manually).
Whereas an Endorser leaves a physical mark on pages passing through a scanner, Digital print will only modify scanned images, i.e. the resulting image data.
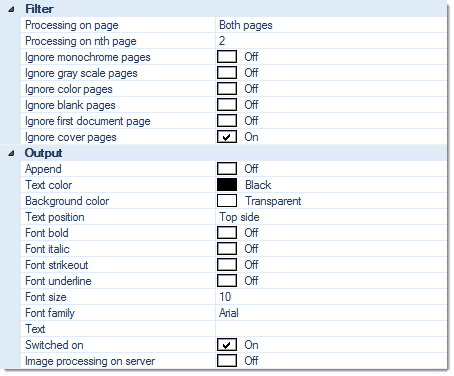
Filter:
Processing on page
Perform this function on ...
- Both sides
- Front pages
- Rear pages
Ignore monochrome pages, Ignore gray scale pages, Ignore color pages
Specifically applies to multistream mode. If any of these three filters are set to On, digital print is turned off for the respective page types. Please note that combining all three options Ignore monochrome pages, Ignore gray scaled pages and Ignore color pages will effectively turn off digital print, all together, since there are no images left to process.
Ignore blank pages
Turns this function off, for all blank pages.
Ignore first document page
Causes this function to skip the first page of every document (which usually is the page triggering document separation).
Ignore cover pages
Turns this function off, for cover pages.
Output:
Append
Text may either be placed within the existing image area (where it may collide with image data), or in additional, appended image area. If this option is activated (On), additional image area will be added and Digital print will be placed within that area. The location of the appended image area is specified by the Text position setting, below.
Text color
Specifies the text color to be used. Either enter the color code manually (RGB hex value) or use the color picker applet, to the right of the input field.
Background color
Specifies the background color to be used. Either enter the color code manually (RGB hex value) or use the color picker applet, to the right of the input field.
Text position
Specifies where the Digital print is placed or where image area with the Digital print is appended. Possible choices are:
Font bold
Use bold text.
Font italic
Set text to italics.
Font strikeout
Use strikethrough text.
Font underline
Use underlined text.
Font size
Choose the desired font size, from the drop-down menu.
Font family
Choose the desired font family, from the drop-down menu.
Text
The digital print function can output fixed text, dynamically created text or a mixture thereof.
Click the
button at the end of the text input line to access all available text options:
The left window contains the list of available variables, which you may add to the list of selected variables, on the right. After highlighting any of the selected variables in the right window, the bottom window will show detail settings, for this variable.
Switched on
Switches this module on or off. Turning this function off will preserve all settings, for later use (as opposed to removing the function). Useful when developing or troubleshooting project templates.
Image processing on server (CROSSCAP Enterprise only)
Image processing requires substantial amounts of CPU capacity. In order to relieve CROSSCAP Scan-Clients from this task and speed up all other processing, image processing functions may be selectively transferred to the CROSSCAP Enterprise server.
If this option is activated (On), then execution of this function will be deferred and processed by the CROSSCAP Enterprise server, later on. Deferred image processing will occur during the pre-process workflow step (see chapter Enterprise Server, section System workflow Enterprise).
