
Descriptions are from top to bottom:
Start batch
The following screen will present the most recently used project template (Last used ...) as the basis for a new batch.
If you wish to use one of the other templates, select the desired template from the list (Standard ...) by clicking on its name once (this will cause the template name to be highlighted). You may also search for a template, by entering all or part of the template name into the search bar above the list.
The settings below the template selection box will change according to the project template highlighted.
Depending on template settings, the fields for Batch name, Directory and/or Batch counter may be write-protected.
Clicking OK will use the current settings to start a new batch. SCAMAX® scan+ is now in project mode and waiting for incoming images.

Close batch
Opens the following dialogue:
Only the two uppermost buttons, Finalize and Finalize and Restart, will cause the batch to be finally closed (and export files to be written to disk).
The exact meaning of each of the five options is as follows:
Finalize
Closes the batch, executes all required processes (or transfers them to the Process manager) and returns SCAMAX® scan+ to quick mode.
Finalize and restart
Closes the batch, executes all required processes (or transfers them to the Process manager) but keeps SCAMAX® scan+ in project mode. SCAMAX® scan+ will automatically open a new batch based on the previously used project template. The batch counter is incremented by one.
Continue scanning
Returns you to the current batch job, for additional scanning or image processing.
Suspend
The current batch will be saved but not processed any further, right now. No files will be output.
To reopen a suspended project at some later time, click on the Suspended Batches button in the Start batch dialogue (see above). Please note: For the Suspended Batches button to become active, you will need to select the appropriate project template, beforehand.
Discard
This command cancels your present batch job and returns SCAMAX® scan+ to quick mode. All scanned images will be lost, no files will be output.

Save as
This button allows the manual export of image data and, in quick mode, is the only way to output scanned and edited images.
All images of the current batch or selected images can be exported. If only certain specific images are to be exported, these must be marked in the thumbnail view before clicking the Save as button.
Using the left mouse button in the thumbnail view, you can hold down the Shift key to mark several images in a range, or hold down the Ctrl key to mark several images individually.
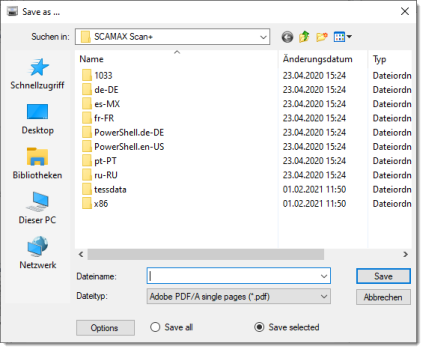
Browse to the desired storage location and enter a suitable file name. SCAMAX® scan+ will add automatic file numbering when exporting multiple images.
Save selected will only save images to disk which you have highlighted beforehand, whereas Save all will save all images, regardless of highlighting.
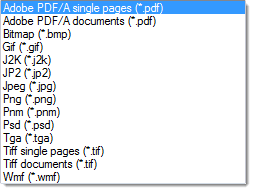
From the file type drop-down list, select the desired file format to be used. The list of available file formats is as follows:
Please note: Only file types: "Adobe PDF/A-Documents (*.pdf)" and "TIFF-Documents (*.tif)" will allow for writing multiple images into one single output file (i.e. multi-page output files). Choosing any of the other file formats will invariably result in one separate file per image!Depending on the file type chosen, the Options button will become active. For PDF/A and TIFF files, further settings are offered here; for all other file types, this button remains greyed out:

Launches the Windows print dialogue.
Please note: By default, all image files will be sent to the printer! Highlighting / selecting images in the thumbnail view will not reliably control print output. As a work-around, please use the "current page" setting, or enter specific page numbers / page number ranges to be printed.
Look and Feel
Changes the color scheme used by SCAMAX® scan+. You may choose between different Design Options / Color Schemes, which include Office 2010 blue, Office 2010 silver and Office 2010 black.
Rather than scanning physical documents, existing image files may be imported into SCAMAX® scan+. These files will behave just like scanned images and can be modified and processed as usual.
In Project mode, all manually imported images undergo the same processing steps (as specified in the current project template) that would also apply to "regular" scanning of paper originals.
Use the File type - (All images) drop-down list to restrict the search to a single image format, see box (1) in the file browser shown further below:

To ensure that multiple images imported at the same time are processed and displayed in the batch in the correct order, the images should be numbered accordingly:
Use the file browser shown above to navigate to the folder containing the desired image files. Then select one or more images using the mouse.
Using the left mouse button, you can hold down the Shift key to mark several images in a range, or hold down the Ctrl key to mark several images individually. Ctrl-A marks all available images, provided that at least one image has already been marked.
Filter options:
To import only very specific files from a directory containing a very large number of (image) files, you can use the following filter options in the File name input field to search specifically for these files. Please make sure that File type and the filter for File name do not contradict each other.
* (asterisk) replaces any number of any characters
? (question mark) replaces exactly one arbitrary character
An example:
'Import images' selection window:
Entering '*.jpg' [Enter] returns all files in the directory with the extension 'jpg' in the results list.
Entering '??-*.jpg' [Enter] returns all files in the directory that have a '-' (hyphen) as the 3rd character in the file name and the extension 'jpg' in the results list.
You can filter as many times as you like in this way, until you find the desired files in your results list.
Import Options:
Simplex / Duplex
When scanning, the scanner will also supply information whether an image originates from the front side or from the back side of a document. This information is missing when importing images as files. Instead, a simulation is used to add this information:
Simplex (Front): Marks all incoming pages as front pages.
Simplex (Back): Marks all incoming pages as back pages.
Duplex (Front / Back): Alternately marks incoming pages as front and back pages, beginning with a front page.
Duplex (Back / Front): Alternately marks incoming pages as front and back pages, beginning with a back page.
Dual-Simplex (Front): Marks all incoming pages as front pages when scanning dual-stream.
Dual Simplex (Rear): Marks all incoming pages as rear pages when scanning dual-stream.
Dual-Duplex (Front/Rear): Alternately marks incoming pages as front and back pages when scanning dual-stream, beginning with two front pages.
Dual-Duplex (Rear/Front): Alternately marks incoming pages as front and back pages when scanning dual-stream, beginning with two rear pages.
PDF rendering resolution
PDF files do not contain any information about image resolution (DPI).
SCAMAX® scan+ requires this information for the conversion to JPEG. Here you can set the resolution with which PDF files are to be read in.
Compress / Uncompress
Compress will internally store all incoming grayscale or color images as compressed JPEG files.
Uncompress will store all incoming images as uncompressed files. Caution: This option will inflate compressed files.
Delete Files
Check this option to have the source images deleted from disk, directly after file import.


Program settings
Opens the Program settings dialogue. For more details, please refer to chapter Program settings.
Shuts down the application.