Let's pretend we need to run a scan job with the following requirements:
A4 paper documents need to be scanned on both sides, with a resolution of 300 dpi and in black & white. Blank pages are not supposed to appear in the output files.
The paper douments in question are folders with personal files. Once scanned, these need to be stored in PDF/A format.
The stack of documents needs to be digitized in such a way that each personal file is stored as an individual file on disk. To this end, separator sheets with patch codes on them have been inserted into the pile of documents, ahead of every personal file.
In order to quickly find any of the scanned content at some later date, the resulting PDF/A files need to be text-searchable.
Let us now see how CROSSCAP can be used to cover this scenario. quick mode will be of little help here (since bar codes need to be recognized), so we'll use Project mode instead. And because it's easier to start with, we'll use the wizard to generate the project template required. Here's how to proceed:
-
Please start your copy of CROSSCAP.
-
Change the project settings mode to wizard: Click on the lower half of icon Project settings (in the Settings toolbar) and tick Wizard.
-
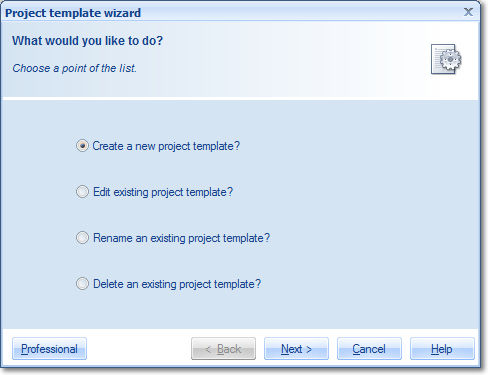
Now click on the top half of icon Project settings, which will start the wizard. A window will open, with several options on how to proceed. Select Create a new project template and confirm by pressing Next.
-
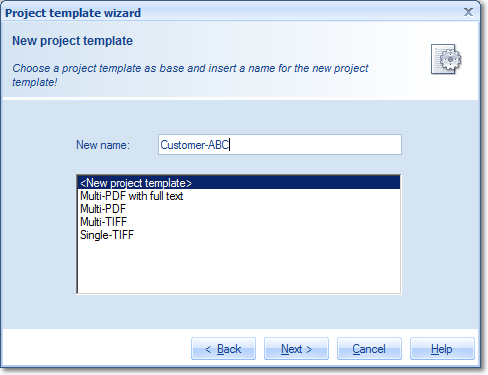
The next screen will present you with a list of available project templates. Since we will be creating an entirely new template, you should not select any of the existing templates, but instead enter a new name for the template, for example Customer-ABC.
-
The next screen requires you to enter a desription for the template. A detailed description might be very helpful in cases where scan operators frequently change places and you need to provide them with background information and instructions for the scan job on hand. For the purposes of this test project, it will suffice to enter just any short text. Then, click Next.
-
The following screen contains some directory options:

The path used for saving the export files at the end of this project is made up of several different components:
1) the project scan directory
2) an optional subdirectory based on date and time information (which we will not use here)
3) a further subdirectory based on the batch name
For Project scan directory, either enter a directory path manually (for example C:\scan\cutomers), or use the button for extended entry: , which will allow you to define the path using the directory browser.
Since this example requires no further subdirectories, please select option Use no subdirectory.
The resulting path used for saving the export files at the end of this project will therefore be: C:\scan\customers\<batch name>\
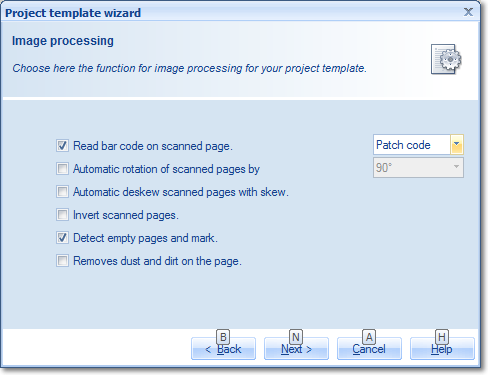
In our example, every personal file is supposed to be stored as a separate output file. In order to achieve this, separator sheets have been added to the pile of documents. Patch codes on those separator sheets will have to be recognized by CROSSCAP, and the program is expected to begin a new output file, in response.
Please perform the following settings, on the next wizard screen (Image processing):
-
Tick the option Read bar code on scanned page and select Patch code, from the drop-down list at the end of the same line. Additionally, tick the option Detect empty pages and mark (for deletion). Confirm your changes by pressing Next.
-
Which brings us to the finalization and file output section (i.e. exporting files).
To begin with, enter a suitable name for the output files (in row Base name for export file(s)), such as Personal. This base name will be automatically suffixed with a document counter, at project runtime.
Our sample scenario calls for the generation of searchable PDF/A files. Therefore, you will need to select PDF/A, as the type of file to generate, and add the option with full text. The latter option will switch text recognition on and add embedded text to the output files. Set the corresponding language option (below the tick box) to the source language of your paper documents, for best recognition results.
Finally, since CROSSCAP is capable of creating more than one file type simultaneously, please make sure that the TIFF option (default) is deselected.
Confirm your changes by pressing Next.

-
You will now be presented with a final confirmation page (Save project template). If you are happy with what you have entered, then confirm by pressing Finish. Your new project template has been saved and is ready for use.
Starting and closing a batch job
-
To start a new batch job, switch over to the Control toolbar and click on Start batch. From the list of project templates, select the one you just created. After pressing OK, the batch will be started.
-
Next, you will need to select a scanner (Select scanner on toolbar Control). Please find more information on this in the section on Scanner selection (in chapter Menu bar functions, Control toolbar).
-
Start scanning by clicking Batch scan. The scanner will begin to operate and the screen will begin to fill with scanned images. During scanning, only the Stop scanner icon remains active.
-
Finally, when all paper documents have been scanned, click on Finalize (on toolbar Control). CROSSCAP will now process the scanned batch and write output files to the directory specified.