Descriptions are from left to right (left half of ribbon, right half further below):
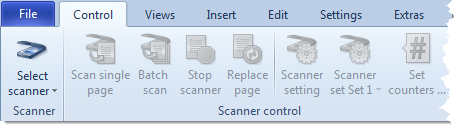
Scanner:
Select scanner
CROSSCAP provides you with two scanner slots, each of which may be assigned to a different scanner. At least one of the two scanner slots needs to be properly configured for the scan process to work (otherwise the Single scan and Batch scan buttons will remain inactive). Assigning and switching scanners is done through the Select scanner button:
Click the bottom half of this button, a drop-down menu will appear. Hover the mouse pointer over one of the menu items labelled First scanner or Second scanner. A list with all camera and scanning devices known to your operating system will open:
Select the desired scanning device by single clicking the respective item. This item will become active and is flagged with a tick mark.
Once you have configured both of the scanner slots, you may switch back and forth between the two devices by clicking the top half of the Select scanner button. The currently active scanner device will also be displayed in the scanner status display at the bottom of the program window.
If a scanner is physically connected but does not show up in the list, there might be a configuration problem.
Please note that WIA scanner drivers will not work properly, with CROSSCAP. They will show up in the list but they should not be selected.


Scanner control:
Single scan
Scans a single page and then stops the scanner. Please note: Page refers to a physical sheet of paper, so in duplex mode, two images will be generated.
Scan all pages
Scans the current document pile until there is no paper left in the ADF (Automatic Document Feeder) of your scanner. Please note: Flat bed scanners typically do not have an ADF.
Stop scanner
The scanner will stop scanning, as soon as possible. You may use Scan all pages to restart the scan.
Replace page
Replaces the selected page (highlighted in the thumbnails view) with image(s) coming from the scanner. When scanning in simplex mode, only the current image will be replaced, when scanning in duplex mode, the current and the following image will be replaced.
Opens the (currently selected) scanner's built in settings dialog.
Changes made here are usually lost whenever the scanner is powered down. Therefore, these settings might have to be re-applied each time the scanner is initialized.
Scanner set 1 ...
If supported (some scanner drivers do not provide this functionality), you may define scanner settings and save them as presets. CROSSCAP will apply these settings when scanning in project mode.
Clicking this button lets you choose from a list of scanner presets. In order to make changes to presets, first select a preset and then open your scanner driver dialog. All settings made will be saved to the preset.


Descriptions are from left to right (right half of ribbon):
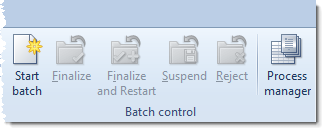
Batch control:
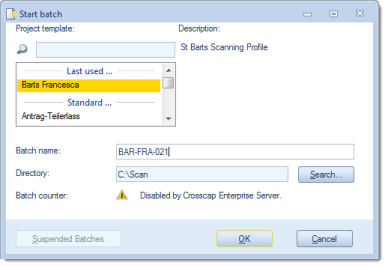
Start batch
Opens the dialogue for selecting a project template and starting a new batch job:
For detailed infomation on starting batch jobs, please refer to the section on Starting and closing batches, in the appendix.
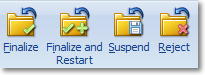
Close batch
In order to terminate an active batch job, use one of these four icons:
Only the two leftmost controls, Finalize and Finalize and Restart, will cause the batch to be finally closed (and export files to be written to disk).
The exact meaning of each of the four controls is as follows:
Finalize
Closes the batch, executes all required processes (or transfers them to the Process manager) and returns CROSSCAP to quick mode.
Finalize and restart
Closes the batch, executes all required processes (or transfers them to the Process manager) but keeps CROSSCAP in project mode. CROSSCAP will automatically open a new batch based on the previously used project template.
Suspend
The current batch job will be saved and not processed any further. No files will be output.
To reopen a suspended batch at some later time, click on the Suspended Batches button in the Start batch window (see above). Please note: For the Suspended batches button to become active, you will need to select the appropriate project template, beforehand.
Reject
This command cancels your present batch job and returns CROSSCAP to quick mode. All scanned images will be lost, no files will be output.
Process manager
This button opens the process manager window. You will be able to see how many batches have been completed and which jobs have not yet been processed. You may also manually (re)start waiting jobs (before the scheduled starting time specified in the Program settings), stop active jobs or purge completed jobs from the list.
Please find more information on this topic in a separate chapter, Process manager.
Statistics
Opens a window containing statistical data. CROSSCAP will log all activities when running a project, this table will give you summary information on all recent batches.