
Descriptions are from left to right (this is the left half of ribbon, the right half may be found further below).
Please note that some of the icons shown below may display differently on your screen, due to limited screen space.
Tools:
Pointer
This is the default operating mode (nothing will be modified). Press this button to revert from destructive editing modes, such as crop, cut or erase.
Manual Deskew
After activating the Manual Deskew button, the cursor will change like this:
indicating that CROSSCAP is waiting for input.
Next, use the cursor to draw a reference line on the image which needs to be deskewed: Press the left mouse button, keep pressed to draw the line and release when the reference line is properly positioned. The length of the reference line is irrelevant, it should however be horizontally aligned with the (skewed) content on the image. The image will now be rotated upright.
Crop
After activating the Crop button, the cursor will change into a crosshair. After drawing a frame around the image area to be preserved, all image data outside the frame will be deleted.
Eraser
Use the eraser to remove unwanted items from an image (e.g. traces of dust and dirt or staple marks). You may choose between three different eraser sizes.
Cut
On operating the Cut button, the cursor will change into a crosshair. After drawing a frame around an image area to be cleared, all image data inside the frame will be removed from the image.


Undo:
Undo/Redo
Allows you to undo and redo up to 20 previous editing actions.
Transform:
Increase brightness, Darken
Increases or decreases the brightness of the selected image.
Decrease contrast, Increase contrast
Increases or decreases the contrast of the selected image.
Decrease gamma, Increase gamma
Increases or decreases the gamma-value of the selected image.
Bitonal
Converts a color or grayscale image into a bitonal (black and white) image.
Gray
Converts a color image into a grayscale image.
Rotate 90°, 180° and 270°
Rotates the image clockwise, by the angle specified.
Flip horizontally / vertically
Flips (mirrors) the current image, along its horizontal or vertical axis.


Descriptions are from left to right (right half of ribbon):
Change:
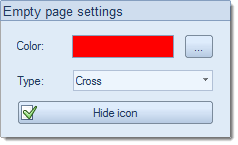
Deletion marker
When pressing the top half of this button, CROSSCAP will insert or remove deletion markers (existing markers will be toggled) for all images highlighted. Press the lower section of this button to change the color and the type of marker applied:
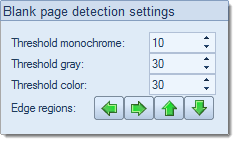
Blank page detection
When pressing the top half of this button, CROSSCAP will perform automatic blank page detection for all images highlighted. Pressing the lower section of this button will allow you to change detection thresholds:
By default, CROSSCAP will exclude all areas close to the image's edges, from blank page detection. Press one or more of the green arrows to selectively include the areas close to the corresponding edge of the page.
Deskew
When pressing the top half of this button, CROSSCAP will vertically align all images highlighted. Press the lower section of this button to set the maximum angle of rotation. Please use the slider to change the value.
Despeckle
When pressing the top half of this button, CROSSCAP will remove traces of dust and dirt from an image. Press the lower section of this button to set the maximum grain size for this operation. Please use the slider to change the value.
Invert
Inverts colors, i.e. changes a positive image to a negative, and vice versa.
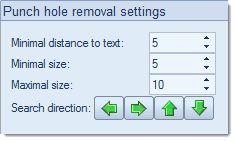
Punch hole removal
Upon pressing the top half of this button, CROSSCAP will remove traces of punch holes from an image (works with 1 Bit black and white scans, only).
Press the lower section of this button to specify limiting factors, such as which margins to examine (Search direction), distance to text content or maximum and minimum hole size allowed:
Line removal
Horizontal and vertical lines are removed from the scanned image (works with black and white scans, only).
Pressing the lower section of this button will allow you to specify various limiting factors:
Border removal
Border removal will automatically crop an image, if shadows / lines / smudges are detected around its edges.
Frame page
Pressing the top section of this button will place a white frame around the perimeter of an image (to mask unwanted borders or shadows). Press the bottom section of this button to set the width of the frame. Please use the slider to change the value.


OCR:
OCR settings
Allows you to set the language to be used during text recognition (applies to all batch, zonal, field OCR). Additionally ticking Deskew will cause CROSSCAP to vertically align images before OCR is performed, which will improve text recognition results.
Zonal OCR
Operating this button will turn zonal OCR on and off (toggle). When turned on (the Zonal OCR button will be highlighted and the cursor will change into a crosshair), you may specify an area to be searched for text by drawing a frame around it (i.e. drag the crosshair whilst keeping the left mouse button pressed). After releasing the left mouse button, OCR will be performed and the resulting text will be placed in the Windows clipboard.
Please note: You may specify search areas and perform OCR repeatedly, for as long as zonal OCR is active. However, any text recognized during the most recent OCR pass will overwrite any text previously placed in the Windows clipboard. Therefore, you will not be able to collect text from different recognition areas in the Windows clipboard, instead you will have to move the contents from the Windows clipboard to your target application immediately, after each of the OCR passes.
Field OCR
Operating this button will turn field OCR on and off (toggle). When turned on (the Field OCR button will be highlighted and the cursor will change into a crosshair), you should first select an index field, by clicking into it. Then, in the image view, you may specify an area to be searched for text by drawing a frame around it (i.e. drag the crosshair whilst keeping the left mouse button pressed). After releasing the left mouse button, OCR will be performed and the resulting text will be placed in the selected index field.
Batch OCR
Operating this button will perform OCR across all images (i.e. the entire batch). OCR results will be placed in the Windows clipboard and may thus be transferred to other applications. Please note that Batch OCR can be very time-consuming, depending on the size of the batch.


