Descriptions are from left to right, and by section:
Scanner:
Select scanner
CROSSCAP provides you with two scanner slots, each of which may be assigned to a different scanner. At least one of the two scanner slots needs to be properly configured for the scan process to work. Assigning and switching scanners is done through the Select scanner button:
Click the bottom half of this button and hover the mouse pointer over one of the menu items labelled First scanner or Second scanner. A list with all camera and scanning devices known to your operating system will open:
Select the desired TWAIN scanning device by single clicking the respective item. This item will become active and is flagged with a tick mark. Please do not select any WIA-drivers which might also be shown - they will not work.Once you have configured both of the scanner slots, you may switch back and forth between the two devices by clicking the top half of the Select scanner button. The currently active scanner device will be displayed in the scanner status display at the bottom of the program window.
If a scanner is physically connected but not shown in the list, there might be a configuration problem.


Basic settings:
Project settings
Clicking the lower half of the Project settings button will allow you to permanently choose between expert mode or the use of the wizard, for creating and modifying project templates. Depending on your choice, clicking the upper section of the Project settings button will either start the wizard (which will guide you through an abridged process of setting up a project), or you will be presented with a comprehensive list of project settings, where you will have to check and make all necessary settings and adjustments by yourself (more flexible, but for experienced users only). For more details, please refer to the separate chapter on Project settings.
Two more options are available from the lower half of the Project settings button, Export project templates and Import project templates.Use these to transfer project templates to and from another PC.
Statistics
Opens a window containing statistical data. CROSSCAP will log all scanned and processed pages when running a project, this table will give you summary information about all recent batches.
Language
CROSSCAP is currently available in two localized versions. Clicking on the upper half of this button switches the application language from German to English and back again, clicking the lower half presents you with a list of languages to choose from, instead.
Program settings
Opens the program settings dialog. Please refer to the separate chapter on Program settings, for more information.


User management:
Managing user rights is a method of restricting access to certain parts of the program functionality by preventing access to respective icons. This might prove helpful, for example, when customizing the software for Scan-Operators: More complex and intricate program functions (such as those required for creating and editing project templates) can be selectively deactivated and thus hidden.
CROSSCAP user management has no effects outside of the boundaries of this application. The Windows operating system and all other Windows applications will remain unaffected by any of the settings described below.
User management can be turned on or off globally, in the program settings (section: Display settings). Please refer to the separate chapter on Program settings, for more information.
Once turned on, any user with Windows Administrator rights (either for the local machine, or for the current Windows domain) may configure CROSSCAP user management.
Edit user rights
This section allows for creating users and roles, editing role rights and assigning users to roles.
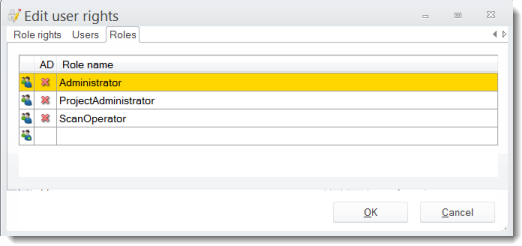
Roles:
Use the Roles tab to show existing user groups (roles) and to create additional or delete obsolete roles.
Three roles are provided by default:
You may create additional roles by entering a new role name into the empty, lowermost line and then pressing Enter.
If the new role name can be found as a user group in an attached Windows AD (Active Directory), it will be marked as such in column AD.
Also, all members of that group will be automatically imported into CROSSCAP and appear on the Users tab, below
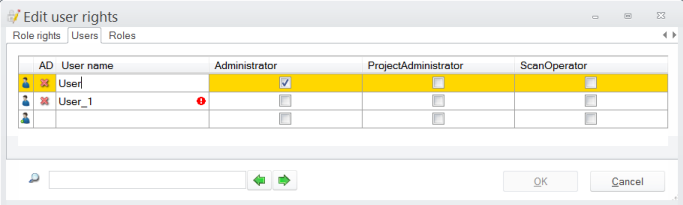
Users:
The Users tab will allow an administrator to assign one or more roles to a user (if a user is assigned to several roles, then their respective rights will be cumulative).
You may create additional users by entering a new user name into the empty, lowermost line and then pressing Enter.
If a username has been imported as a member of a group from the Windows AD (see above), it will be checkmarked in column AD.
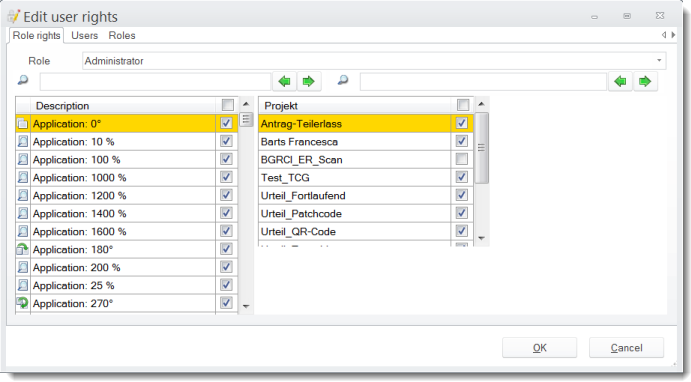
Role rights:
Though the names of the three default roles imply certain restrictions, any of the configurable rights may be arbitrarily assigned to them. This is done through the Role Rights tab and also applies to any newly created roles:
Select one of the existing roles to edit (from the drop-down list at the top). Then, grant or remove access to any of the functions from the list on the left-hand side, by checking or unchecking appropriate check-boxes. Operating the check-box in the uppermost row (labelled Description) will collectively turn all access rights on or off.
Apart from granting or removing rights, you may also assign project templates to one or more roles. The list on the right-hand side will show all presently available project templates, checking or unchecking them will either make them accessible or hide them from view, for the current role.
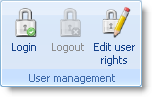
Login
Use this button to log on as a different CROSSCAP specific user. Doing so will apply the rights restrictions associated with that user (depending on the roles he or she has been assigned).
Important: Logging into CROSSCAP user management is only possible if the user has a Windows passwort assigned. Windows accounts without password protection cannot be used.
Logout
Use this button to log out of CROSSCAP user management.