The file importer will automatically import images (scanned elsewhere) into a CROSSCAP Enterprise system, for further processing (please note: you may manually import images through a CROSSCAP Scan-Client, at any time).
Such images may, for example, originate from a multifunction printer (frequently found in office environments). A multifunction printer will usually not be interfaced to a CROSSCAP Scan-Client directly (via TWAIN), but will instead store its scanned images somewhere in the network, on a shared drive.
In order to perfom automatic file import, you will have to decide on a common transfer directory, first (this directory needs to be specified on the scanning device, as well as on the CROSSCAP Enterprise server). For more details on setting up the transfer directory, please refer to the section on Preparations (Enterprise Server), in chapter Installation & Preparation.
The transfer directory will be regularly polled by the file importer, continually checking for the presence of signalling files. A signalling file indicates that a complete batch of scanned images is ready for import. Two different types of signalling files are recognized by the CROSSCAP Enterprise file importer, Semaphore-files and XML-files.
Semaphore Import
Semaphore Import uses plain, empty files, for signalling.
The filename and the filename extension may be arbitrarily assigned. Please note that the filename of the signalling file and the name of the transfer directory are also processed by the file importer and are made available as variables, within CROSSCAP Enterprise - see the section on Properties of Batch name template, far below.
The mere presence of a semaphore file (not its content) indicates the following: the image files in the same directory (as the semaphore file) are ready for import (there are no further image files), and all files within this directory belong to the same batch.
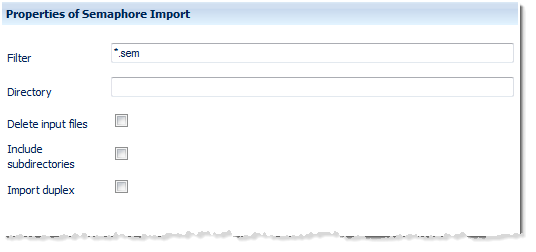
Filter
Restricts the search for signalling files to specific filenames and/or filename extensions.
Directory
The directory you want the file importer to regularly check for signalling files (Please note: the transfer directory does not necessarily have to be a shared drive on your CROSSCAP Enterprise server, you may also use any other server/shared directory, within your local network).
Delete input files
If this option is enabled (checkbox ticked), all imported files and the semaphore file will be deleted, after processing.
If this option is disabled (checkbox unticked), then the imported files and the semaphore file will not be deleted. Instead, the signalling file will be renamed by appending ".done" to its filename, indicating that it has been successfully processed.
Include subdirectories
If this option is enabled (checkbox ticked), then the file importer will not only search the transfer directory (as specified above) for semaphore files, but also all of its subdirectories. This way, more than one batch can be simultaneously queued for import, and these may even originate from different sources.
If this option is disabled (checkbox unticked), then the file importer will exclusively search the transfer directory specified above. If more than one batch needs to be imported, then the scanning device or the scan-operator will need to ensure that the transfer directory is cleared from image files, before proceeding.
Import (as) duplex
If this option is enabled (checkbox ticked), then imported images will be alternately interpreted as the front and reverse sides of pages, and image metadata will be changed to reflect this.
If this option is disabled (checkbox unticked), then all images will be treated alike.
XML Import
XML Import strictly uses files with an *.xml filename extension, for signalling.
The filename itself (but not the *.xml filename extension) may be arbitrarily assigned. Please note that the name of the signalling file and the name of the transfer directory are also processed by the file importer and are made available as variables, within CROSSCAP Enterprise - see the section on Properties of Batch name template, far below.
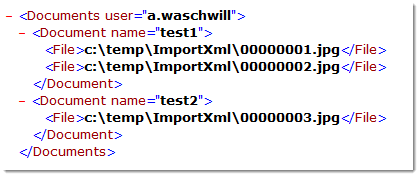
The file's xml content provides information about the batch to be imported, e.g. where the image files are located (they do not have to be in the same directory as the signalling file) and who performed the scan.
If document separation was performed during scanning, then the xml-file will also convey information about the location of document separators and respective document names (which will replace the labelling usually derived from bar-code recognition).
Here is a simple example for an xml signalling file:
Directory
The directory you want the file importer to regularly check for xml signalling files (Please note: the transfer directory does not necessarily have to be a shared drive on your CROSSCAP Enterprise server, you may also use any other server/shared directory, within your local network).
Delete input files
If this option is enabled (checkbox ticked), all imported files and the xml signalling file will be deleted, after processing.
If this option is disabled (checkbox unticked), then no files will be deleted. Instead, the xml signalling file will be renamed by appending ".done" to its filename, indicating that it has been successfully processed.
Include subdirectories
If this option is enabled (checkbox ticked), then the file importer will not only search the transfer directory (as specified above) for xml files, but also all of its subdirectories. The use of subdirectories will allow for the creation of differing directory variables (useful for batch naming, see below).
If this option is disabled (checkbox unticked), then the file importer will exclusively search the transfer directory specified above. Since several xml signalling files can co-exist in one directory, this imposes no limitation on the number of batches which may be imported (as is the case with semaphore files).
Import (as) duplex
If this option is enabled (checkbox ticked), then imported images will be alternately interpreted as the front and reverse sides of pages, and image metadata will be changed to reflect this.
If this option is disabled (checkbox unticked), then all images will be treated alike.

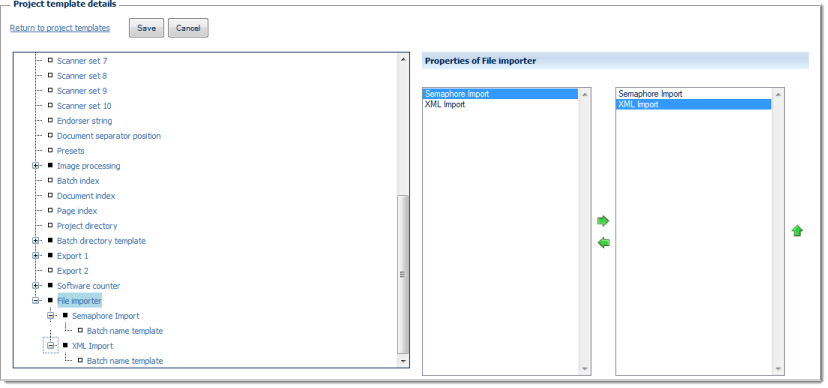
Properties of Batch name template

The left side of the Properties of ... window lists all configuration options available for this item, the right side shows the options chosen so far. By highlighting one of the options and operating the green left or right arrow buttons, the option can be moved back and forth between the left column (available options) and the right column (selected options). If an option is highlighted in the right column (selected options), it may be moved up or down the list by operating the green up or down arrows. This changes the sequence in which the options are executed (processing will proceed from the top of the list).
Any items in the right column (selected options) will also appear in the configuration tree (far left), where they can be highlighted for further configuration.
Two import specific variables (the name of the signalling file and the name of the transfer directory) are available for generating the Batch name template. For more and detailed information on the remaining variables, please refer to the separate section on Variables, in the Appendix.
Behaviour during import, behaviour in case of error
File locking during import
In order to prevent a semaphore or xml signalling file from being opened by some other process, during import, it is temporarily renamed by appending "~" (tilde). As soon as the file has been processed successfully, it is finally renamed to "*.done".
Supported image file formats
The following types of image files can be processed by the file importer:
*.jpg, *.tiff, *.tif, *.bmp, *.gif, *.j2k, *.jp2, *.png, *.pnm, *.psd, *.tga, *.wmf
Other file name extensions (or other file formats) and corrupted files will cause an error (see below).
Error file, log file
If a semaphore or xml signalling file cannot be processed successfully, file import will abort and the signalling file will be renamed by appending ".err". Also, an additional file ending with ".log" will be generated, this file contains further information on the error which caused the problem.