In order to link all CROSSCAP Enterprise system components, the CROSSCAP Multi-Client and CROSSCAP Scan-Client will have to be appropriately configured. Also, the CROSSCAP Enterprise server itself needs to be configured for first use:
Initial Configuration of the CROSSCAP Enterprise server
-
Double check and modify all global CROSSCAP Enterprise settings. You will find a detailed explanation in chapter Main menu (server), Administration toolbar, section Global settings.
-
Create an initial set of users and user groups, for later use with the CROSSCAP Multi-Client and CROSSCAP Scan-Client. You will find a detailed explanation in chapter Main menu (server), Administration toolbar, section User administration.
Initial Configuration of the CROSSCAP Multi-Client
You have already linked CROSSCAP Multi-Client to your CROSSCAP Enterprise system, during installation. Additionally, please also check all other related program settings. Within the CROSSCAP Multi-Client program, navigate to Program settings > Common settings > Enterprise server:
Server URL
Enter the Server-URL (network address) of the machine running the CROSSCAP Enterprise core system (process server).
The address needs to be formatted as follows: http://hostname:80/CEI/CrosscapEnterpriseInterface.asmx
Please replace hostname with the network name of your CROSSCAP Enterprise server.
HTTP-Mode
Toggles between LAN (Off) and Internet operating mode (On). The default setting in Off (LAN).
http mode Off (CROSSCAP Enterprise and CROSSCAP Multi-Client within the same local area network): server-shares (UNCs) are used for transferring image data.
http mode On (CROSSCAP Enterprise and CROSSCAP Multi-Client are connected through the internet): the http protocol is used for transferring image data.

Initial Configuration of the CROSSCAP Scan-Client
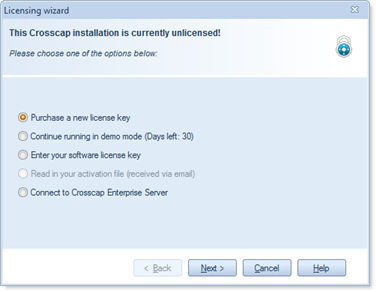
On first program start, this licensing dialogue will be shown.
Since you will be using one of the CROSSCAP Enterprise licenses for CROSSCAP Scan-Client clients, you need to choose the last option, Connect to CROSSCAP Enterprise server.
Press Next to continue.
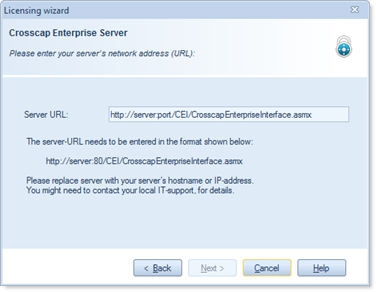
Enter the Server-URL (network address) of the machine running the core system (process server).
The address needs to be formatted as follows: http://server:80/CEI/CrosscapEnterpriseInterface.asmx
Replace server with the network name of your server
(the default port is 80, adjust only if necessary).Press Next to continue. The CROSSCAP Scan-Client will launch.
After successfully linking to a CROSSCAP Enterprise system, please remember to double-check all related program settings (see chapter Program settings, Common settings, section Enterprise Server, in the separate CROSSCAP Scan-Client manual).
Use Enterprise Service
This option will enable (On) or disable (Off) the use of server, for this machine.
CROSSCAP Scan-Client will run stand-alone when this setting is disabled (Off) and in multi-user (CROSSCAP Enterprise) mode when enabled (On).
Server URL
Enter the Server-URL (network address) of the machine running the process server.
The address needs to be formatted as follows: http://hostname:80/CEI/CrosscapEnterpriseInterface.asmx
Please replace hostname with the network name of your CROSSCAP Enterprise server.
HTTP mode
Toggles between LAN (Off) and Internet operating mode (On). The default setting in Off (LAN).