
Descriptions are from left to right:
All templates
Pressing this button will produce a list of all project templates known to the system:
Clicking any of the column-headers will re-sort the entire list, according to the contents of that column.
Project templates can be opened and modified by using the icon in the Edit column.
Project templates may be deleted either individually, by using the Delete button (the red cross from the Edit column) or collectively, by using the joint Delete action, from the drop-down list of commands (bottom left, below table). You will need to tag all project templates you wish to delete (using the checkboxes provided in the second column), beforehand.
Here's an explanation of the various table columns:
Project template
The name of the project template. Clicking an entry in the Project templates column will switch to the respective Project template details view, where template details may be viewed and edited. The Project template details view is discussed in more detail, in chapter Templates (server).
Project counter
The current value of the project counter, indicating the amount of batch-jobs launched with this project template, so far.
Force index
If the checkbox in this column is ticked (use the left button from the Edit column to switch to edit mode, first), then any batch started with this project template will force manual indexing. Indexing will be performed using the CROSSCAP Multi-Client. The Indexing workflow step will be skipped if this checkmark is omitted (see chapter Getting started, section Workflow CROSSCAP Enterprise).
Force quality check
If the checkbox in this column is ticked (use the left button from the Edit column to switch to edit mode, first), then any batch started with this project template will force a quality check. Quality checking will be performed using the CROSSCAP Multi-Client. The Quality check workflow step will be skipped if this checkmark is omitted (see chapter Getting started, section Workflow CROSSCAP Enterprise).
Active
If the checkbox in this column is ticked (use the left button from the Edit column to switch to edit mode, first), then this project template is generally available for use. The project template will be unavailable (i.e. it cannot be used to launch batch-jobs) if this checkmark is removed.
Group
The user group allowed to launch batches with this project template. All other user groups will not be able to access this project template (with exception of the administrator group - they always have access to all project templates, regardless of group setting).
Delete images
The number of days the system will wait before deleting temporary image data. This value may be reduced to 0 (zero), in order to have temporary image data removed from the system as fast as possible. However, since data purges are performed periodically, as part of regular system housekeeping, they will not necessarily take immediate effect.
Please note: Two items determine system behaviour during workflow step Delete (see chapter Getting started, section Workflow CROSSCAP Enterprise): Delete images (specified here) and Delete data (see Administration toolbar in this chapter).
Temporary image data (created during batch processing) is deleted in a separate step before corresponding batch metadata are finally removed from the database. This sequence prevents "orphaned" temporary image data. As a consequence, the deletion periods will add up and - in sum - determine the total time required to purge all batch data from the system.
Please note: Above deletions will only affect temporary images and batch metadata. Exported data (such as image and index files) will remain unaffected!
Priority
Sets the processing priority for batches launched with this template. A high priority (e.g. 3) will cause the CROSSCAP Enterprise server to process these batches ahead of all batches with lower priorities (e.g. 5 or 7). A value of 1 corresponds to the highest processing priority, arbitrary integer values larger than 1 may be used for all lower priority levels.

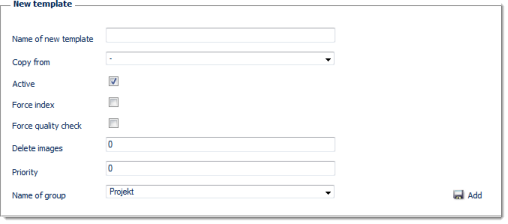
Pressing this button will display the input form for a new template:
Name of new template
Firstly, you will need to give your new template a name. Make sure that it is sufficiently distinct from existing templates.
Copy from
Project templates may be created from scratch or on the basis of existing templates. If you wish to copy an existing template, select a template from the Copy from drop-down list. Leave this option unaltered or re-set it to dash ("-") if you wish to create a project template from scratch.
Active
If this tick box is checked, then this project template will be generally available for use. The project template will be unavailable (i.e. it cannot be used to launch batch-jobs) if this checkmark is removed.
Force index
If this tick box is checked, then any batch started with this project template will force manual indexing. Indexing will be performed using the CROSSCAP Multi-Client. The Indexing workflow step will be skipped if this checkmark is omitted (see chapter Getting started, section Workflow CROSSCAP Enterprise).
Force quality check
If this tick box is checked, then any batch started with this project template will force a quality check. Quality checking will be performed using the CROSSCAP Multi-Client. The Quality check workflow step will be skipped if this checkmark is omitted (see chapter Getting started, section Workflow CROSSCAP Enterprise).
Delete images
The number of days the system will wait before deleting temporary image data. This value may be reduced to 0 (zero), in order to have temporary image data removed from the system as fast as possible. However, since data purges are performed periodically, as part of regular system housekeeping, they will not necessarily take immediate effect.
Please note: Two items determine system behaviour during workflow step Delete (see chapter Getting started, section Workflow CROSSCAP Enterprise): Delete images (specified here) and Delete data (see Administration toolbar in this chapter).
Temporary image data (created during batch processing) is deleted in a separate step before corresponding batch metadata are finally removed from the database. This sequence prevents "orphaned" temporary image data. As a consequence, the two deletion periods will add up and in sum determine the total time required to purge all batch data, from the system.
Please note: Above deletions will only affect temporary images and batch metadata. Exported data (such as image and index files) will remain unaffected!
Priority
Sets the processing priority for batches launched with this template. A high priority (e.g. 3) will cause the CROSSCAP Enterprise server to process these batches ahead of all batches with lower priorities (e.g. 5 or 7). A value of 1 corresponds to the highest processing priority, arbitrary integer values larger than 1 may be used for all lower priority levels.
Name of group
Select the user group allowed to launch batches with this project template, from the drop-down list. All other user groups will not be able to access this project template (with the exception of the administrator group - they always have access to all project templates, regardless of group setting).
Finally, click the Add button to save your settings. The display will now return to the All templates view (see far above). The newly created project template will have been added to the end of the list.
Your new project template is incomplete and requires further modification. Therefore, you should click on the name of the template, in the All templates view, which will take you to the Project template details view, where template details may be viewed and edited. The Project template details view is discussed in more detail, in chapter Templates (server).
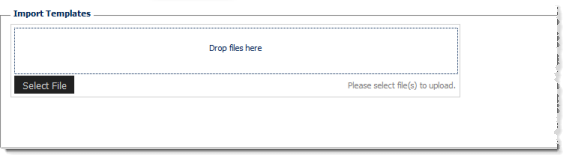
Import templates
Project templates can be transferred between CROSSCAP Enterprise systems. In order to do so, they first need to be exported as a *.zip file (see Export templates, below), at the originating system.
The *.zip file containing project templates may be imported by either clicking the Select file button and using the Windows File open dialogue or by grabbing the file with the mouse (e.g. from the Windows Explorer) and dropping it over the Drop files here screen-area (Drag & Drop):
As a result, the file will become ready for file upload to the CROSSCAP Enterprise server:
Clicking the Upload button will conclude the import process, all freshly imported project templates should now be listed in the All templates view.

Export templates
Individual or multiple project templates may be transferred to other CROSSCAP Enterprise systems.
Firstly, you will need to identify the desired project template(s) by placing appropriate checkmarks:
Clicking the Export button will then create a corresponding *.zip file and open the Windows File save dialogue.
