Contents:
Button
Date/Time (Index)
Float (Index)
Integer (Index)
On/Off (Index)
Person (Index)
Separator
String (Index)
Validation (Index)
Index fields are used to capture, process and forward additional information (metadata) relating to the images scanned. Index data may be automatically extracted from images (text strings, bar code values, technical image information) or manually assigned (such as keywords and notes).
Index fields are initialized at the beginning of every new batch and may either be filled with data immediately and automatically while scanning, or manually, after scanning has completed.
This data may be used internally (for program control, as a variable), and may also be exported as an index file at the end of batch processing, for handover to downstream systems (e.g. DMS/ECM systems). Alternatively, index data may also be embedded as metadata into certain file types. Index data may also be used to dynamically create export paths and filenames.
Internally, index data is also used for labelling document separators (in the thumbnails view), as soon as at least one document index field has been defined. SCAMAX® scan+ will use the first (top) index field, if several index fields have been defined. If no document index fields are defined, document labelling will instead use the values created by barcode or OCR recognition.
To set up index fields, please proceed as described below. First, open Project settings. There you will find the section 06-Index fields. The general settings available for index fields are as follows:

06-Index fields
Index update on page action
Setting this to Off suppresses the index refresh triggered by page actions, e.g. when pages are added, moved or deleted within the batch. By default, this option is switched On.
Index update on empty page change
Setting this to Off suppresses the index refresh triggered whenever deletion markers are set or removed. By default, this option is switched On.
Batch Index
Batch index values can only be assigned once per batch: you may change batch index values anywhere within the batch (i.e. in any document or on any page of the batch), but doing so will always change these values for the entire batch. For more detailed information, please refer to the section Creating index fields, below.
Batch Index start page
Sets the page on which automatically captured batch indices are pre-filled into batch index fields. Usually, this is the first page of the batch. For example, if a bar code value needs to be read from the third page of the batch, increase the batch start page to 3.
Enable package index
Here you can turn package mode on or off for your project template. Setting this to On makes the additional, fourth package level available.
Package index
Package index values may differ for each package, but can likewise only be assigned once per package: you may change package index values anywhere within a package (i.e. on any page of a package), but doing so will always change these values for the entire current package. This setting only takes effect once package mode has been enabled (see above). For more detailed information, please refer to the section Creating index fields, below.
Package Index start page
Sets the page on which automatically captured package indices are pre-filled into package index fields. Usually, this is the first page of a package. For example, if a bar code value needs to be read from the third page of each package, increase the package start page to 3.
Document Index
Document index values may differ for each document, but can likewise only be assigned once per document: you may change document index values anywhere within a document (i.e. on any page of that document), but doing so will always change these values for the entire current document. For more detailed information, please refer to the section Creating index fields, below.
Document Index start page
Sets the page used to pre-fill document index fields. Usually set to the first page of a document, but may also be set to higher page numbers, e.g. if document index values need to be fetched from barcodes on page 3 of each document. Also determines the page displayed when using Ctrl-PageUp or Ctrl-PageDown, to browse through documents. If, for example, separately inserted separator sheets are used for document separation, it is advisable to move the document index start page to page 3 - this would then be the first content-relevant page of each document, and pressing Ctrl-PageUp or Ctrl-PageDown would take you there directly.
Page Index
Page index values may be assigned individually for each scanned page. For more detailed information, please refer to the section Creating index fields, below.
Creating index fields:
Index fields may be defined on three or four levels:
Batch index values remain valid across the entire batch, i.e. they stay the same throughout a batch. A batch index field can only be filled with one data item per batch; therefore, any change made anywhere within the batch will always affect the entire batch.
Package index values relate to the current package and may differ from package to package within a batch. The required package level must be explicitly enabled first (see above).
Document index values relate to the current document and may differ from document to document within a batch. However, the data contained within one document index field will always remain the same, across all pages/images of that document. Therefore, changes made to a document index field on any page within a document will change that data, for the entire document.
Page index values relate to the current page and may differ from page to page, within a batch or document.The configuration options described in this manual are identical for all four index levels (batch, package, document and page index); the detailed descriptions that follow are therefore equally valid for all index levels.
A Batch index field will be discussed here, as an example.
Open the desired index level (here: Batch index) using the button for the extended menu
:
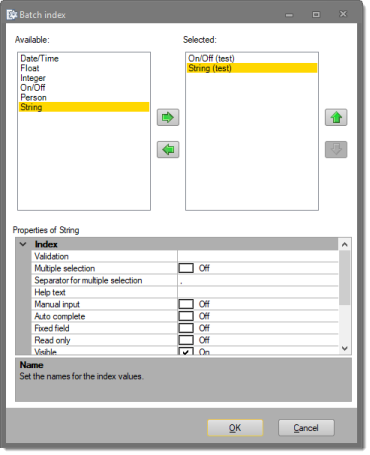
On the left side (Available), select the desired index type and copy it to the right window (Selected) by using the button labelled with a green arrow to the right. Repeat as often as necessary. If you wish to remove an entry from the right window (Selected), highlight the entry and operate the button labelled with a green arrow to the left.
Highlighting one of the active entries in the right-hand window allows it to be moved up or down using the vertical, green arrows. The order of the index values in this list affects the order in which they are later displayed in the Index window: the topmost entry is placed at the top of the respective section of the Index window. In the case of document indices, the topmost entry is additionally used to label the document separators shown in the thumbnails view.
After highlighting one of the selected index types in the right window, the bottom window (Properties of ...) will show you detail options for this function.
On the following pages, these options will be discussed in more detail.
Generally, the following data types may be used:
Date/Time
An index field of type Date/Time can assume values based on date and/or time.
Float
An index field of type Float can assume numerical values with decimal places, e.g. in the form 10.23.
Integer
An index field of type Integer can only assume whole-numbered values, i.e. numbers without decimals, e.g. in the form 10 or 999.
On/Off
An index field of type On/Off can only assume two boolean values, True or False.
Person
An index field of type Person will accept the name formats commonly used in ERP databases (first name/last name, last name/first name, etc.) and will correctly validate and convert them. Names pulled from a directory service, for example, are also accepted.
String
An index field of type String will accept any text strings containing printable characters and numerals.
The following elements are available for further design of the Index view:
Button
Inserts a button that can be used to start a PowerShell script stored here.
Separator
Inserts a separator line, which can be used to visually separate related sections from one another.
Creating index file(s):
Once you have created all the desired index fields, you may, if required, define an index file in the Export section. For more information, please refer to Index file, in the section on Export options.
A brief outline of the process can be found here:
1. Select index file as an export option:
2. Structure of the index file:
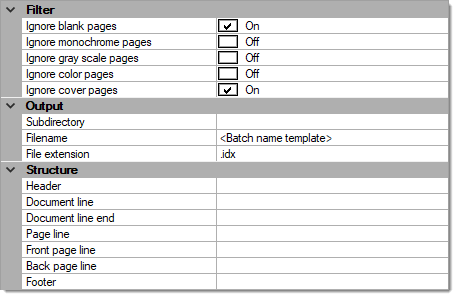
Here you define which fields are output at which position in the index file (header, package, document, page or footer line). For these sections, you can choose from a wide range of ready-made SCAMAX® scan+ variables, but you may also select your own custom-defined index fields.
Your custom-defined index fields can be found under the SCAMAX® scan+ variables Batch, Package, Document, and Page index. For example, to select an index value that you previously defined as a Batch index, proceed as follows:
-
Select Batch index.
-
Select the desired index name from the Index name drop-down menu.
To add further fields, repeat this procedure. You can add an unlimited number of index values.
3. File name and directory structure
Set the file extension for the new index file (e.g. .txt).
In the next step, you can assign an additional subdirectory for storing the index file, as well as a file name.
Performing indexing:
In order to automatically read values into index fields and/or enter them manually, first scan your documents as usual. Once scanning is complete, the Index window fills with the index fields you defined beforehand (if the Index window is not visible, please enable it from the View menu). Index fields are grouped in the Index window by Batch, Package, Document and Page index.
In the following example, only document index fields are present:
Automatically captured index values (e.g. bar code values or text strings recognized via zonal OCR) or suggested values for index fields are entered automatically into the respective index fields immediately after scanning is complete (here, e.g. the index fields Doc type and Subject). The remaining index values can then be added manually in the course of further batch processing.
This can be done as free-form entry, by selecting from suggestion lists (drop-down lists), or (in the case of date values) via a so-called calendar applet. Instead of free-form text entry, the so-called lasso function may also be used, in which index values are captured via zonal/field text recognition, as shown above, e.g. for the index field File no. 1.
If index fields are defined as so-called mandatory fields via a Validation (as shown above, e.g. for the Date field), then missing or incorrect input values are flagged with a red exclamation mark, and the current batch cannot be finalized.
Once you have entered all index values correctly, finalize the batch as usual. Depending on how your project template is configured, an index file will be generated in addition to the image data, and/or index values will be used to define path- and filenames ...
