Contents
On/Off (Index)
Date/Time (Index)
Float (Index)
Integer (Index)
Person (Index)
Button, Separator
String (Index)
Validation (Index)
Index fields are used to capture, process and forward additional information (metadata) relating to the images scanned.
Index data may be automatically extracted from images (text strings, bar code values, technical image information) or manually assigned (such as keywords and notes).
Index fields are initialized at the beginning of every new batch and may either be filled with data immediately and automatically while scanning, or manually, after scanning has completed.
When a batch is finalized, index data may be exported to the file-system as a separate index file, or it may be embedded as metadata, into certain file-types. Index data may also be used to dynamically create export paths and filenames.
Internally, index data is used for labelling document separators (in the thumbnails view), as soon as at least one document index field has been defined. CROSSCAP will use the first (top) index field, if several index fields have been defined. If no document index fields are defined, document labelling will instead use the values created by barcode or OCR recognition.
Index fields may be defined on a batch-, document- or page level.
-
Index fields assigned on a page level may contain different data for each image/page.
-
Index fields assigned on a document level may contain different index data for different documents. However, the data contained withinone document index field will always remain the same, across all pages/images of that document. Therefore, changes made to a document index field on any page within a document will change that data, for the entire document.
-
Index fields assigned on a batch level may only be filled with one data item, per batch. Therefore, changes made to a batch index field anywhere within a batch will change that data, for the entire batch.
Handling is identical, for all three levels of index fields (Batch index, Document index, Page index). A Batch index field will be discussed here, as an example:
Creating index fields:
Open Project settings (from the Settings toolbar). Here you will find a section covering Index fields.
Batch Index, Document Index, Page Index
Create index fields by first selecting the desired index level (here: batch index). Then, use the
button to open the extended dialogue:
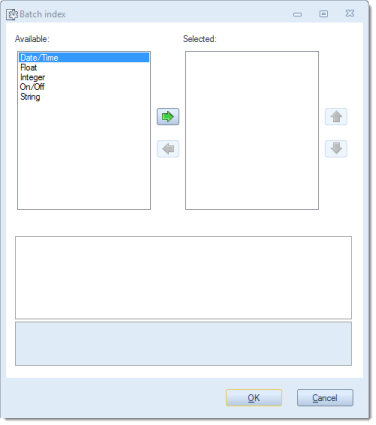
On the left side (Available), select the desired index type and copy it to the right window (Selected) by using the button labelled with a green arrow to the right. Repeat as often as necessary. If you wish to remove an entry from the right windows (Selected), highlight the entry and operate the button labelled with a green arrow to the left.
After highlighting one of the selected index types in the right window, the bottom window (Properties of ...) will show you detail options for this function. On the following pages, these options will be discussed in more detail. Generally, the following data types may be used:
On/Off
An index field of type On/Off can only assume two boolean values, true or false.
Date/Time
An index field of type Date/Time can assume values based on date and/or time.
Float
An index field of type float can assume numerical values with decimal places.
IntegerAn index field of type integer can only assume whole-numbered values. i.e. numbers without decimals.
PersonAn index field of type person will accept different name formats, e.g. names pulled from a directory service.
String
An index field of type string will accept any text strings containing printable characters and numerals.
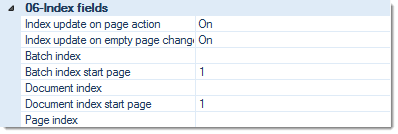
Index update on page action
If set to On (default), this option will force an index refresh whenever pages are added, moved or deleted.
Index update on empty page change
If set to On (default), this option will force an index refresh whenever deletion markers are set or removed.
Batch Index start page
Sets the page for pre-filling batch index fields with their Default values. Usually, this is set to page 1, but it may also be set to higher page numbers, e.g. if batch index values need to be fetched from barcodes on page 3 of a batch.
Document Index start page
Sets the page used to pre-fill document index fields. Usually set to the first page of a document, but may also be set to higher page numbers, e.g. if document index values need to be fetched from barcodes on page 3 of each document. Also determines the page displayed when using Ctrl-PageUp or Ctrl-PageDown, to browse through documents.
Performing indexing:
In order to assign values to index fields, scan your documents as usual. Index fields may be filled automatically, e.g. by detecting bar codes or by recognising text, or manually, by editing data in index fields, using the Index view. Both methods may be used in combination.
To display the index data form, activate the Index view from the Views toolbar.

After you have entered (or corrected) all of the desired index values, finalize the batch. Depending on your project template, an index file may be generated and/or index values are used to define path- and filenames ...
Creating index file(s):
For more information, please refer to Index file, in the section on Export options.