Digital print will automatically place custom text on scanned images (as opposed to the Stamp tool, which needs to be operated manually).
Whereas an Endorser leaves a physical mark on pages passing through a scanner, Digital print will only modify scanned images, i.e. image data.
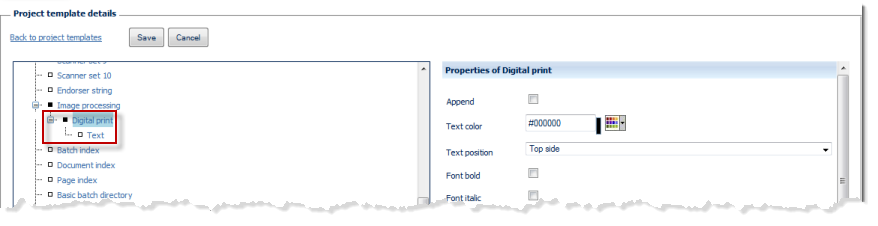
Properties of Digital print:
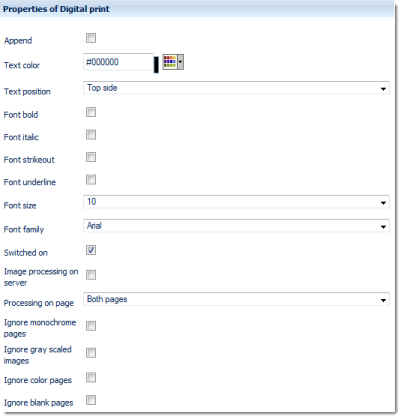
Append
Text may either be affixed on top of an image (where it may collide with existing image data), or placed to the side of an image, in an appended special area. If this option is activated (checkbox ticked), then additional image area will be added and the Digital print will be placed there.
The location of the appended image area is specified by the Text position setting, below.
Text color
Specifies the text color to be used. Either enter the colour code manually (RGB hex value) or use the colour picker applet, to the right of the input field.
Text position
Specifies where the Digital print is placed or where image area with the Digital print is appended. Possible choices are:
Font bold
Use bold text.
Font italic
Set text to italics.
Font strikeout
Use strikethrough text.
Font underline
Use underlined text.
Font size
Choose the desired font size, from the drop-down menu.
Font family
Choose the desired font family, from the drop-down menu.
Switched on
Switches this module on or off. Ticking the checkbox will turn this function on. Removing the checkmark will turn this function off but will preserve all settings, for later use / manual activation.
Image processing on server
Image processing requires substantial amounts of CPU capacity. In order to relieve CROSSCAP Scan-Clients from these tasks and speed up all other processing, image processing functions may be selectively transferred to the CROSSCAP Enterprise server.
If this option is activated (checkbox ticked), then the execution of this function will be deferred and processed by the CROSSCAP Enterprise server, later on. Deferred image processing will occur during the pre-process workflow step (see chapter Getting started, section Workflow CROSSCAP Enterprise).
Please note: If any errors occur during image processing on the CROSSCAP Enterprise server, manual indexing (on the CROSSCAP Multi-Client) will be enforced (even if manual indexing was not specified in the project template).
Whenever image processing functions are transferred to the CROSSCAP Enterprise server, we generally recommend to specify separate quality checks and/or manual indexing, since there is no other chance to inspect (and possibly rectify) images processed by the server, prior to finalization.
Also, please take care to treat all interdependent image processing functions the same way, i.e. either run all of them on the CROSSCAP Enterprise server or have all of them processed by the CROSSCAP Scan-Client.
Processing on page
Limits this function to certain pages. Possible choices are:
- Both pages
- Front page
- Rear page
Ignore monochrome pages, Ignore gray scale pages, Ignore color pages
Specifically applies to multistream mode. If any of these three filters are set to on (checkbox ticked), then this function is turned off for the respective page types. Please note that combining all three options Ignore monochrome pages, Ignore gray scale pages and Ignore color pages will effectively turn off execution all together, since there are no images left to process.
Ignore blank pages
Turns this function off (checkbox ticked) for all blank pages (reduces CPU-load).
Properties of Text
Apart from using Fixed text, any of the other variables may be used to dynamically create custom text.
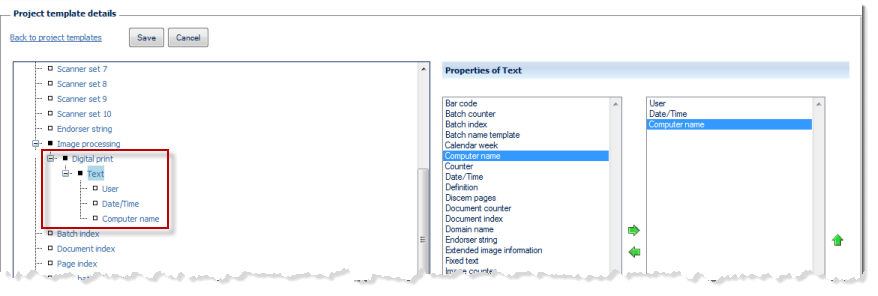
The left side of the Properties of Text window lists all configuration options available for this item, the right side shows the options chosen so far. By highlighting one of the options and operating the green left or right arrow buttons, the item can be moved back and forth between the left column (available items) and the right column (selected items). If an option is highlighted in the right column (selected options), it may be moved up or down the list by operating the green up or down arrows. This changes the sequence in which the items are displayed (text assembly will proceed from the top of the list).
Any items in the right column (selected options) will also appear in the configuration tree (far left), where they can be highlighted for further configuration.
You may use any of the available variables (such as date/time, calendar week, batch counter and/or fixed text) for generating custom text. For more and detailed information on variables please refer to the separate section on Variables, in the appendix.