Descriptions are from left to right:
Batches (button)
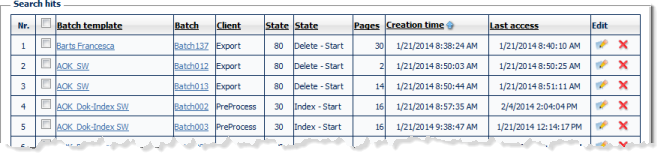
Pressing this button will result in the display of two windows: The Search form window (left) and the Search hits window (right).
Search hits (right window)
By default, the Search hits window will list all batch-jobs known to the system, with each line in the table representing one batch-job. Batch information is grouped into colums, clicking any of the column-headers will re-sort the entire list, according to the contents of that column.
Most of the column-headers are self-explanatory, the following, however, require closer inspection:
Column: Client
This indicates the workflow step which caused (effected) the current batch status (see below). Possible workflow steps are : Scan, Pre-process, Index, Quality check, Process, Signature, Export und Delete (see chapter Getting started, section Workflow CROSSCAP Enterprise).
Columns: State
Each of the workflow steps mentioned above is divided up further, into four main operating states: start (waiting), work (active), complete (finished) and the error state (a problem has occured). The left of the two State columns contains the numerical code for the current state, the right column displays its plain text equivalent.
Template details:
Clicking an entry in the Batch template column will switch to the respective Project template details view, where template details may be viewed and edited. Please note that changes to a project template will only affect future batch-runs (based on that template), but not the current batch-job. The Project template details view is discussed in more detail, in chapter Templates (server).
Modifying batches:
Batches can be individually modified by using the left button in the Edit column. Batches may also be collectively modified by first tagging several batches (using the checkboxes provided in the second column) and then selecting a joint action from the Choose command ... drop-down list (bottom left, below table).
A common modification is to return batches to a previous workflow step and/or state (please note that during collective batch editing, batches can only be returned to one of the Start states).
However, if necessary, batches can also be deleted completely (and irrevocably), either by using the Delete button (the red cross from the Edit column) or by using the joint Delete action, from the drop-down list of commands.
Caution! Deleting active (unfinished) batch jobs may cause program crashes at client workstations still attempting to process this batch! Therefore, make sure that batches have reached an uncritical state (such as Delete - Start), before deleting them from the server list of batches.
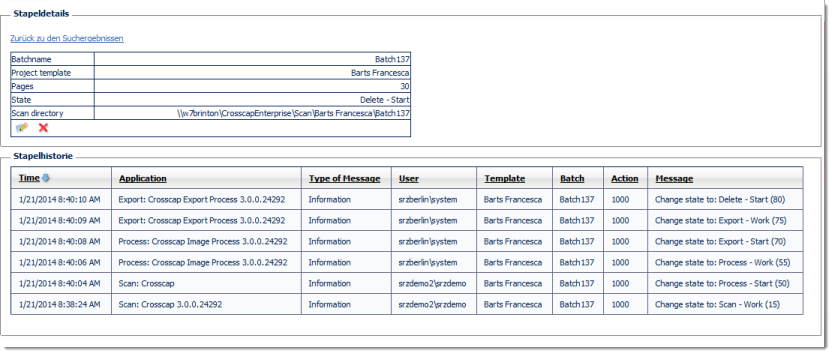
Batch details:
Clicking an entry in the Batch column will switch to a combined view containing detail and event information, for this particular batch-job:
The top section of this window (Batch details) summarizes the information from the previous Search hits view, whereas the bottom section (Batch history) shows the complete list of batch events (i.e. changes in batch state), so far.
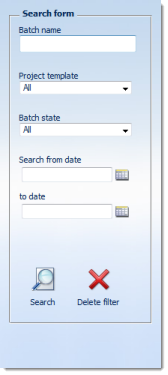
Search form (left window)
As mentioned above, the Search hits view will - by default - show the entire list of all batch-jobs known to the system. Since this list can become very long, the Search form allows for a selective display of batches, depending on various filter criteria:
Input field: batch name
Search for a complete batch name or parts thereof. Matching is case insensitive, Wildcards may be used (* = text string, ? = one character). e.g. Batch00?, Batch*, BA* ...
Drop-down list: Project template
Select one from the list of the project templates in use.
Drop-down list: Batch state
In addition to specifying exact combinations of workflow steps and states, unspecific states are also available as search option, such as Work (or Error). These search options will result in a list of all batches currently active (or experiencing problems), regardless of workflow step.
Search from date ... to date
Either enter the desired value directly (format MM/DD/YYYY) or use the buttons provided, to the right of the input fields.
Search and Delete filter
Please do not forget to reset your search settings (Delete filter), after use!
Pressing this button will result in the display of the History window:
This list will show all batch events (any change in workflow step and state) for all batches known to the system. Each line of the table corresponds to one particular event. Clicking one of the column-headers will re-sort the entire list, according to the contents of that column.
Using the drop-down lists provided for columns Type and Project template, the amount of information may be suitably reduced.
Using the drop-down list provided for Type, the list of displayed events can be reduced to just one type of message, such as Error (there was a problem, processing has been halted), Warning (there was a problem, but processing has continued) or Information (non-critical, informative).
If any problem shows up in this list (i.e. an Error or a Warning), then it is generally adviseable to also consult the Server protocol. The Server protocol will usually contain more exhaustive (and thus more helpful) information, regarding the issue on hand.
As an alternative to actively checking server protocols and batch logs, you may also configure an e-mail push service, which will automatically send you notifications whenever batch processing has run into problems or whenever batches have become overdue. Once configured, the push service will issue a daily summary report listing all current issues, in the early morning hours. For more details, please refer to the section on the Administration toolbar, in this chapter.

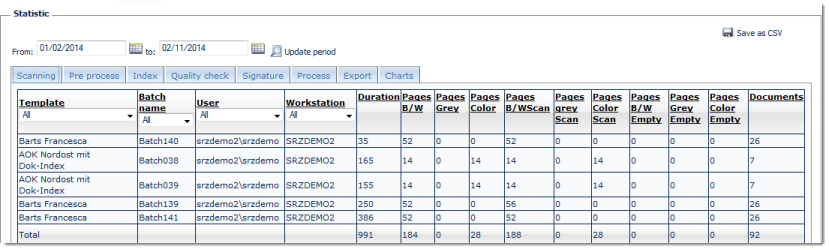
Statistics
Pressing this button will result the following type of display:
The Statistics table lists all batch-jobs known to the system, with each line in the table representing one batch-job. The last line (Total) provides totals for all columns containing statistical batch data (such as amounts of pages processed).
Clicking one of the column-headers will re-sort the entire list, according to the contents of that column. Using the drop-down lists provided for columns Template, Batch name, User and Workstation, the amount of displayed batches (rows) may be suitably reduced.
The tabs labelled Scanning, Pre process, Index, Quality check, Signature, Process and Export (left above the first table row) refer to the various workflow steps (see chapter Getting started, section Workflow CROSSCAP Enterprise). Depending on which tab has been selected (the default tab is Scanning), only those batches will be listed which have actually traversed this workflow stage (e.g., if a batch has not run through the Signature workflow step, then it will not show up, under the Signature tab).
The two date fields above the tabs may be used to specify a timeframe. Enter the desired From: and to: dates, then click Update period. Only those batches which were active within the specified timeframe will be listed, the Totals row will adjust accordingly.
The Statistics table may be saved for further processing, in its momentary state, by pressing the Save as CSV button on the top right. The resulting CSV file (comma separated values) can be imported into a spreadsheet application (such as Microsoft Excel), without any further modification.
Finally, a special tab labelled Charts will produce two pre-defined pie-charts showing Batches per Template and Pages per Template.